
Car fenders, also known as quarter panels, are meant for protecting the wheel wells of your vehicle and are notorious for taking the most damage in minor accidents. This means that they are likely going to need replacing at some point in your vehicle’s life—whether it be for cosmetic defects or serious damage.
Many vehicle owners opt to get their car fenders replaced at an auto repair shop or their dealership, but both options can be quite costly. Did you know replacing the fender of a car is one of the easier replacement projects you can do? Car fenders and car doors are replacement parts that can be DIY’ed more easily than some other car parts.
Today we’re discussing everything about car fenders. What they are, where they are, the cost to replace them, and whether you can repair and replace fenders yourself.
What is a Fender on a Car?
The fender of a car is a protective panel of metal located above all four wheel wells. They are also called quarter panels for this same reason. The two panels in the front are called front fenders and the two in the rear are called rear fenders.
We sell plenty of salvaged fenders across many vehicle makes and models. Check out our fender parts supply to get an ideal of pricing and what is available.
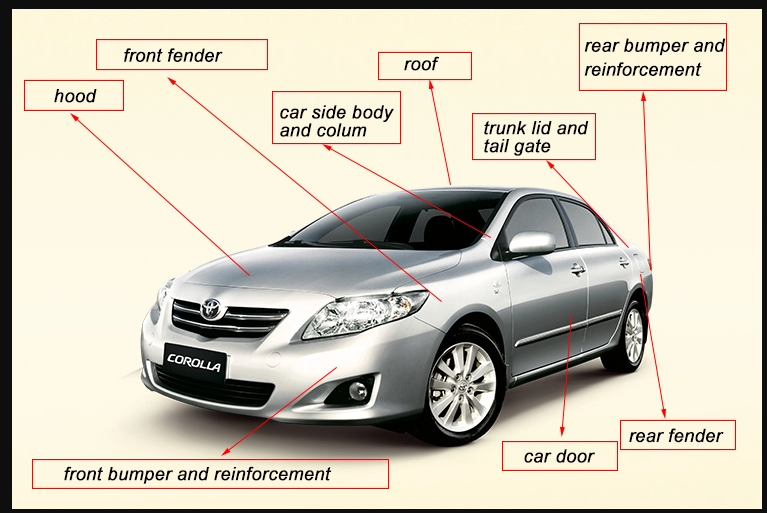
Where is the fender on a car?
The image below gives a brief overview of the exterior metal components of a car. It’s good to familiarize yourself with these parts and where they are located, should you ever need future repair work done.
How much does it cost to fix a fender?
The price of replacing a fender depends on where you go and how much of the fender needs to be fixed. At an auto repair shop, a small fender repair can be $500-$1,000 but prices can range dramatically. At a car dealership, expect to pay well over a few grand.
Can I replace the fender myself?
The good news is that yes, you can replace a fender all by yourself! With some research, the right part ready to go, some matching car paint, and time, you can have your new fender ready to go in as little as a single day.
Front Fender Replacement Process
The front fender replacement process is pretty straightforward. The first thing you need to do is know your vehicle’s make and model to be able to purchase the correct OEM part. You’ll likely want OEM versus an aftermarket part here because an OEM part will be exactly the same original manufacturing part. This means the car part will blend seamlessly with the rest of the car’s exterior.
Aside from the replacement fender, you’ll need the correct metal hardware to bolt it into place, a rust resistant primer, paint color, and a spray paint gun.
1. Buy the OEM part and accessories
First, you’ll need the correct OEM fender part for your vehicle. This ensures the best fit without needing any modifications or welding. See if you can purchase your fender piece with the necessary hardware, if not, you’ll have to account for this as well.
2. Sand and prime it
Next, you’re going to want to do a few layers of sanding and priming. Don’t forget to add a rust-resistant base coat under the primer.
Sanding scratches the surface of the metal to allow paint to stick and match the texture of the rest of the vehicle. A sanded surface will allow primer, paint, and a glossy finishing coat to adhere much better to the exterior than a non-sanded surface.
Don’t forget to add the rust-resistant primer to the back side of the fender. This ensures that any weather, mud, dirt, and debris that gets caught behind the fender won’t rust out the fender.
3. Paint to match your vehicle
After a few rounds of sanding and priming, you’ll want to use the matching car paint color to paint the newly primed fender. With today’s automobile color code matching process, it should be fairly easy to find the matching paint color for your car. You may be able to find a can of the matching paint color secondhand as well.
4. Bolt the fender into place
Once the paint has dried, it’s time to bolt the fender into place. You may want to examine the existing fenders to see where exactly they are bolted into place and bolt the new piece into the same spots.
You can flip to the fender piece’s backside to see where the screws are meant to be placed in the wheel well.
Rear Fender Replacement Process
The great thing about having four fenders is that the replacement process for the rear fenders is exactly the same as the front fenders! Follow the same process we outlined above and you’ll have replica fenders in no time.
Save Money by Salvaging Your Fender Replacement
A fender replacement can be a fairly easy and inexpensive DIY project. Find out the exact parts you need before you get started, and if you have questions along the way, reach out to our staff at Nationwide Auto Recycling!
Reach out to us if you’re interested in exploring our inventory of OEM fender parts in Central Massachusetts. We can help assist your fender replacement project from start to finish!